Creating ads
An ad is a unit of advertisement. Includes one or more media files with different resolutions for screens with corresponding proportions or resolutions.
Contents:
Bulk ad creation in Auto by frequency campaigns
To save time on creating ads with the same settings in one and the same Auto by frequency campaign, you can use bulk ad creation.
In this case you simply need to add several files, and the ads will be created automatically, using the settings you defined in Ad template settings.
To upload files in bulk, click Add files on the campaign’s page and select files, or drag and drop files into the box.

Wait for the files to upload. Once they are uploaded they will appear in the list.

Single-piece ad creation and setup
Single-piece ad creation is mainly used in campaigns with Manual strategy. It can also be used in an Auto by frequency campaign, especially when you need to upload same-content ads but in different sizes to proferly fit the screens with different resolutions or proportions.
To create an ad click on the New ad button on the campaign’s page and define ad’s settings.
You can watch this lesson on YouTube.
General settings
Enter the name of the ad or leave the field empty, in this case the ad will acquire the name of the first file uploaded into the ad. Then define general settings:
-
Select Ad type. Type may not be changed after you save the ad.
-
Set the duration of one impression of the ad. If you set a value larger than the actual duration of the ad the black screen will display the rest of the remaining time after the ad’s been played.
-
Set the cost of one impression of the ad.
Active period
Within campaign duration perion you can set different active period for an ad, so that this ad would appear on screens only part time of campaign's duration. So one ad can start its playback later that campaign's start date, or stop its playback earlier than campaign's end date. Ad's active period cannot go beyond campaign's duration period.
To set a different active period for an ad:
-
In the ad's settings, in the Active period section uncheck the Ad's active period is the same as campaign's duration check mark.

-
Set desired period.
-
Click Save.
Content and resolutions
If you want to play back the same media content on screens with different resolutions you have probably prepared files with different sizes to fit properly onto each screen. But you don’t need to create another ad for every size of the media file you have. You can upload all the media files of different sizes into one ad and bind them to corresponding screens.
The Content and resolutions section appears only after you select ad type.
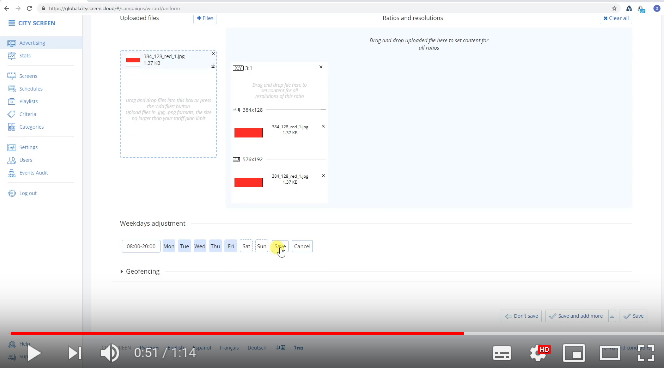
This section consists of two parts: one for media content (on the left), the other represents your screens and frames grouped by ratios and resolutions (on the right).
Upload media content
To upload files click Files or drag and drop files into the box.

Wait for the files to upload. Once they are uploaded they will appear in the list.
To add a website click Website and insert the website URL in the pop-up dialogue.
Bind files to screen resolutions
The files automatically get attached to screens with corresponding resolutions.

You can also bind files to screens manually.
You can bind websites to screens only manually.
To bind media content manually drag and drop uploaded media content to screens on which you want the media content to be displayed.
There are three ways to bind media content to screens:
-
You can either bind media content to all screens no matter the resolution dropping it into the top of the Ratios and resolutions box.
-
Or bind media content to a group of screens having the same proportions dropping it into the corresponding proportions group box.
-
Or bind media content to a single screen dropping it into the corresponding resolution box.
Every screen will play back exactly the media content which is bound to the corresponding screen resolutions.
An ad will not be played back on a screen if no media content was bound to it in the Ratios and resolutions section.
Weekdays adjustment
| Note: This is a setting for ads of automatic campaigns only. |
If you want to play back the ad on a specific day or time you need to adjust the weekdays and time settings:
-
Press the Adjustment button, then select days and define time.
-
Click Save to confirm or Cancel to dismiss the adjustments.

Geofencing
| Note: This is a setting for ads of automatic campaigns only. |
The Geofencing setting relates to the non stationary screens equipped with the GPS system which transmits its location (like the screens on moving vehicles). In this case the ads would play back only when the screen’s location falls within the ad’s geofencing settings.
By default the Geofencing section is collapsed.
To select the particular area of playback:
-
Click on the Draw area button.
-
Draw an area using your mouse.
-
Click Complete to finish drawing.
To delete the area click on the bin icon by the Draw area button.
Order of ads in the playback
You can set the order of ads in which they will be played back on screens. The order of ads is especially important if you have enabled the Stick ads together option in the campaign, or if you use Decrease frequency playlist policy.
To set the order of the ads within a campaign:
-
Go to the Advertising page and select a campaign.
-
Drag and drop ads within the list.

